Android Fragment is part of Android app UI or represents a behavior (DialogFragment,ListFragment)of the particular portion in an application. You can think of Fragments as module section UI or behavior of Activity with its own Lifecycle. In this tutorial, you will see Android Fragment Example in Kotlin.
Come to the definition, You can use multiple fragments in a activity and same fragment in multiple Activity in the Android application.

Fragments lifecycle is directly affected by Activity. For example, when the activity is paused, so are all fragments in it, and when the activity is destroyed, so are all fragments. You can add and remove fragments in activity during activity onResume() state (while an activity is running ).
Android introduced fragments in Android 3.0 (API level 11) to support more dynamic and flexible UI on a large screen like tablets.
You should design each fragment as a modular and reusable activity component because each fragment has its own layout, behavior and lifecycle callbacks.

Kotlin is known the official language for android app development, so we will develop Android Fragment example app using Kotlin.
Creating a Fragment
To create a fragment, you must create a subclass of Fragment (or an existing subclass of it).
You can do it with 2 ways, First Create a class and extended with Fragment class and create resource layout file.
OR
Second ways is Right Click on Package -> New -> Fragment -> Fragments (Blank)
then give Fragment Name , check Fragment Layout Name – > Finish

That’s it your fragments has created. I removed (unchecked) factory methods and interface callbacks.
Completed Code of Android Fragment Example
Step 1. Create an android project in the android studio (Follow this tutorial: Android First Program in Android Studio)
Step 2. Create 2 Fragments and its resource layout. Follow upper section #Creating a Fragment
First fragment resource file fragment_first.xml, Outer Layout is FrameLayout, you can use the choice of your layout (LinearLayout, RelativeLayout or ConstraintLayout etc)
<FrameLayout xmlns:android="http://schemas.android.com/apk/res/android"
    xmlns:tools="http://schemas.android.com/tools"
    android:layout_width="match_parent"
    android:layout_height="match_parent"
    android:background="#C0C0C0"
    tools:context="in.eyehunt.androidfragmentexample.FirstFragment">

    <TextView
        android:layout_width="wrap_content"
        android:layout_height="wrap_content"
        android:layout_gravity="center"
        android:text="First Fragment"
        android:textSize="16sp" />

</FrameLayout>
FirstFragment.kotlin
package `in`.eyehunt.androidfragmentexample

import android.os.Bundle
import android.support.v4.app.Fragment
import android.view.LayoutInflater
import android.view.View
import android.view.ViewGroup

/**
 * A simple [Fragment] subclass.
 */
class FirstFragment : Fragment() {

    override fun onCreateView(inflater: LayoutInflater?, container: ViewGroup?,
                              savedInstanceState: Bundle?): View? {
        // Inflate the layout for this fragment
        return inflater!!.inflate(R.layout.fragment_first, container, false)
    }

}// Required empty public constructor
Second fragment resource file fragment_second.xml, Both fragments layout containing TextView widget to show text.
<FrameLayout xmlns:android="http://schemas.android.com/apk/res/android"
    xmlns:tools="http://schemas.android.com/tools"
    android:layout_width="match_parent"
    android:layout_height="match_parent"
    tools:context="in.eyehunt.androidfragmentexample.SecondFragment">

    <TextView
        android:layout_width="wrap_content"
        android:layout_height="wrap_content"
        android:layout_gravity="center"
        android:text="Second Fragment"
        android:textSize="16sp" />

</FrameLayout>
SecondFragment.kotlin
package `in`.eyehunt.androidfragmentexample

import android.os.Bundle
import android.support.v4.app.Fragment
import android.view.LayoutInflater
import android.view.View
import android.view.ViewGroup

/**
 * A simple [Fragment] subclass.
 */
class SecondFragment : Fragment() {

    override fun onCreateView(inflater: LayoutInflater?, container: ViewGroup?,
                              savedInstanceState: Bundle?): View? {
        // Inflate the layout for this fragment
        return inflater!!.inflate(R.layout.fragment_second, container, false)
    }

}// Required empty public constructor
Step 3. Add following code in the main_activity.xml resource file
Its Static way to add fragment in Activity so you must add android:name="in.eyehunt.androidfragmentexample.SecondFragment" and android:name="in.eyehunt.androidfragmentexample.FirstFragment code
<?xml version="1.0" encoding="utf-8"?>
<LinearLayout xmlns:android="http://schemas.android.com/apk/res/android"
    xmlns:tools="http://schemas.android.com/tools"
    android:layout_width="match_parent"
    android:layout_height="match_parent"
    tools:context="in.eyehunt.androidfragmentexample.MainActivity"
    android:orientation="horizontal">

    <fragment
        android:id="@+id/first_frg"
        android:name="in.eyehunt.androidfragmentexample.FirstFragment"
        android:layout_width="0dp"
        android:layout_height="match_parent"
        android:layout_weight="1" />

    <fragment
        android:id="@+id/second_frg"
        android:name="in.eyehunt.androidfragmentexample.SecondFragment"
        android:layout_width="0dp"
        android:layout_height="match_parent"
        android:layout_weight="2" />
</LinearLayout>
MainActivity.kotlin will remain same, see below code
package `in`.eyehunt.androidfragmentexample

import android.support.v7.app.AppCompatActivity
import android.os.Bundle

class MainActivity : AppCompatActivity() {

    override fun onCreate(savedInstanceState: Bundle?) {
        super.onCreate(savedInstanceState)
        setContentView(R.layout.activity_main)
    }
}
Step 4. Now Run the application, in emulator or On your Android device
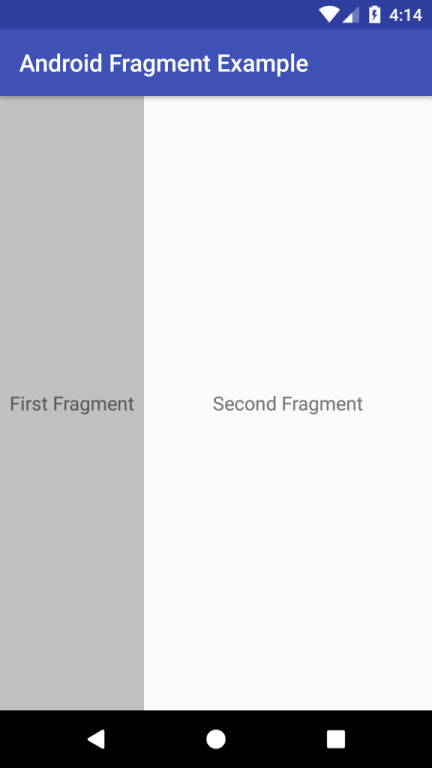
Output screenshot Android Fragment example app :
Download Link and Source code Android Fragment example in Github
https://github.com/EyeHunts/AndroidFragmentExample/
Note : This example (Project) is developed in Android Studio 3.0.1 ,tested on Android 7.1.1 ( Android Nougat), compile SDK version API 26: Android 8.0 (Oreo)
MinSdkVersion=”15″
TargetSdkVersion=”26″
Coding in Kotlin
Managing Fragments
To manage the fragments in your activity (dynamically), you need to use FragmentManager. To get it, call getSupportFragmentManager() from your activity.
Performing Fragment Transactions
A great feature about using fragments in your activity is the ability to add, remove, replace, and perform other actions with them, in response to user interaction. Each set of changes that you commit to the activity is called a transaction and you can perform one using APIs in FragmentTransaction.
Bonus: Example of Using Managing Fragments and Performing Fragment Transactions ” Creating and Using Fragments dynamically“